可以下拉缩放HeaderView的ListView:PullToZoomInListView
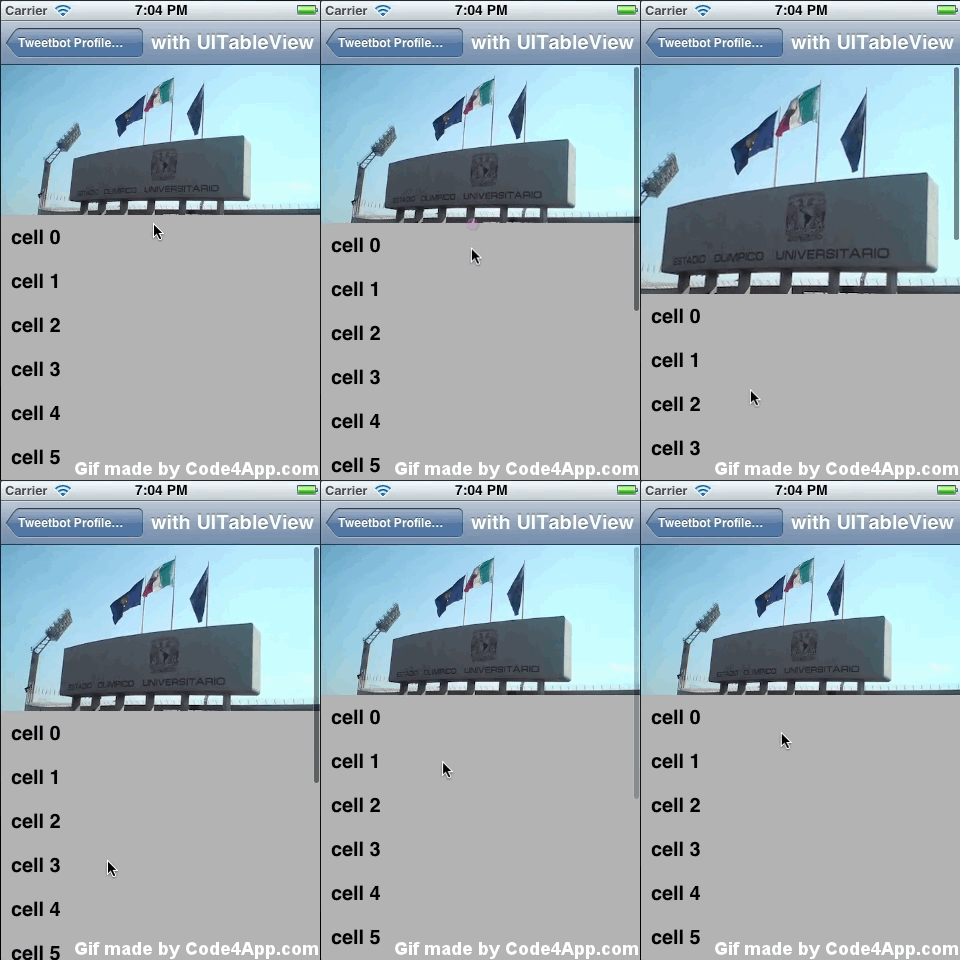
下面这种效果在ios应用中很常见:

其实在android中也有不少应用实现了这种效果,比如知乎日报(新版本好像去掉了),但是我觉得做的最好的还是“最美应用”。于是将最美应用的apk下载下来,用apktool反编译出其xml文件,发现它用的是自定义的一个ListView控件:
com.brixd.android.utils.ui.PullToZoomExpandableListView,在网上搜不到相关信息,显然是自己写的了,于是再用dex2jar将最美应用的classes.dex反编译成java代码,当然编译出来的只是其混淆过的代码,但是仔细分析一般还是能够看出一些有用的东西,很多第三方的开源代码我都是在反编译别人的代码中知道的。
不幸的是虽然大致能从反编译的代码中看出其结构,也找出了PullToZoomExpandableListView这个类(其实是两个还有个是PullToZoomListView,估计这个才是最符合我需求的),但是PullToZoomListView中处理手势的关键代码完全混淆了,放弃,只能寻找他法。
一般遇到这种情况我都想到github和stackoverflow,特别是github上,最近关于android的东西越来越完善,在github上搜listview,总算找到了一个完全符合我需求的ListView,看了代码才发现,最美应用的PullToZoomListView其实90%的代码和它相同,实现原理则是100%相同。突然觉得最美应用有点不厚道,用了开源的代码都改成自己的了,不过很多人都是这样的。
github地址如下:https://github.com/matrixxun/PullToZoomInListView

public boolean onTouchEvent(MotionEvent paramMotionEvent) {
        Log.d("mmm", "" + (0xFF & paramMotionEvent.getAction()));
        switch (0xFF & paramMotionEvent.getAction()) {
        case 4:
        case 0:
            if (!this.mScalingRunnalable.mIsFinished) {
                this.mScalingRunnalable.abortAnimation();
            }
            this.mLastMotionY = paramMotionEvent.getY();
            this.mActivePointerId = paramMotionEvent.getPointerId(0);
            this.mMaxScale = (this.mScreenHeight / this.mHeaderHeight);
            this.mLastScale = (this.mHeaderContainer.getBottom() / this.mHeaderHeight);
            break;
        case 2:
        .........
}
我将这些数字改成了能看懂的形式如 MotionEvent.ACTION_MOVE。同时将paramMotionEvent这个参数名改成了比较熟悉的ev,paramMotionEvent作为一个动作事件太长了,看起来真不舒服,其他地方未做任何修改。我修改过的代码放到了百度网盘:
http://pan.baidu.com/s/1hqrDyoW
其实PullToZoomListView的实现原理很简单主要是在case MotionEvent.ACTION_MOVE:代码段中判断向下滑动的偏移量,根据这个来改变listview headerView内容区域的高度,并且在手指放开的那一刻,停止缩放,启用一个动画来使HeaderView平滑的恢复到放大之前的状态。
下面是缩放过程的关键代码:
case MotionEvent.ACTION_MOVE:
    Log.d("mmm", "mActivePointerId" + mActivePointerId);
    int j = ev.findPointerIndex(this.mActivePointerId);
    if (j == -1) {
        Log.e("PullToZoomListView", "Invalid pointerId="
                + this.mActivePointerId + " in onTouchEvent");
    } else {
        if (this.mLastMotionY == -1.0F)
            this.mLastMotionY = ev.getY(j);
        if (this.mHeaderContainer.getBottom() >= this.mHeaderHeight) {
            ViewGroup.LayoutParams localLayoutParams = this.mHeaderContainer
                    .getLayoutParams();
            float f = ((ev.getY(j) - this.mLastMotionY + this.mHeaderContainer
                    .getBottom()) / this.mHeaderHeight - this.mLastScale)
                    / 2.0F + this.mLastScale;
            if ((this.mLastScale <= 1.0D) && (f < this.mLastScale)) {
                localLayoutParams.height = this.mHeaderHeight;
                this.mHeaderContainer
                        .setLayoutParams(localLayoutParams);
                return super.onTouchEvent(ev);
            }
            this.mLastScale = Math.min(Math.max(f, 1.0F),
                    this.mMaxScale);
            localLayoutParams.height = ((int) (this.mHeaderHeight * this.mLastScale));
            if (localLayoutParams.height < this.mScreenHeight)
                this.mHeaderContainer
                        .setLayoutParams(localLayoutParams);
            this.mLastMotionY = ev.getY(j);
            return true;
        }
        this.mLastMotionY = ev.getY(j);
    }
    break;
其中
localLayoutParams.height = ((int) (this.mHeaderHeight * this.mLastScale));
就是根据滑动偏移计算出新的高度,mLastScale是一个系数,只相对于原始高度的比值,mLastScale是根据垂直偏移计算出来的,其实这个mLastScale具体该怎么计算取决于你自己的想法,我根据我自己的想法也写了个方法,也能得到缩放效果,只是没他这个效果好。
缩放之后如果手指放开,需要平滑回复原始高度:
case MotionEvent.ACTION_UP:
    reset();
    endScraling();
    break;
reset的代码如下
private void reset() {
    this.mActivePointerId = -1;
    this.mLastMotionY = -1.0F;
    this.mMaxScale = -1.0F;
    this.mLastScale = -1.0F;
}
这个只是恢复一些初始值,但是真正实现平滑过渡是在endScraling过程中,endScraling()的实现如下:
private void endScraling() {
    if (this.mHeaderContainer.getBottom() >= this.mHeaderHeight)
        Log.d("mmm", "endScraling");
    this.mScalingRunnalable.startAnimation(200L);
}
交给了mScalingRunnalable,mScalingRunnalable是一个内部类:
class ScalingRunnalable implements Runnable {
    long mDuration;
    boolean mIsFinished = true;
    float mScale;
    long mStartTime;
    ScalingRunnalable() {
    }
    public void abortAnimation() {
        this.mIsFinished = true;
    }
    public boolean isFinished() {
        return this.mIsFinished;
    }
    public void run() {
        float f2;
        ViewGroup.LayoutParams localLayoutParams;
        if ((!this.mIsFinished) && (this.mScale > 1.0D)) {
            float f1 = ((float) SystemClock.currentThreadTimeMillis() - (float) this.mStartTime)
                    / (float) this.mDuration;
            f2 = this.mScale - (this.mScale - 1.0F)
                    * PullToZoomListView.sInterpolator.getInterpolation(f1);
            localLayoutParams = PullToZoomListView.this.mHeaderContainer
                    .getLayoutParams();
            if (f2 > 1.0F) {
                Log.d("mmm", "f2>1.0");
                localLayoutParams.height = PullToZoomListView.this.mHeaderHeight;
                ;
                localLayoutParams.height = ((int) (f2 * PullToZoomListView.this.mHeaderHeight));
                PullToZoomListView.this.mHeaderContainer
                        .setLayoutParams(localLayoutParams);
                PullToZoomListView.this.post(this);
                return;
            }
            this.mIsFinished = true;
        }
    }
    public void startAnimation(long paramLong) {
        this.mStartTime = SystemClock.currentThreadTimeMillis();
        this.mDuration = paramLong;
        this.mScale = ((float) (PullToZoomListView.this.mHeaderContainer
                .getBottom()) / PullToZoomListView.this.mHeaderHeight);
        this.mIsFinished = false;
        PullToZoomListView.this.post(this);
    }
}
我觉得难点不在于如何改变`mHeaderContainer的高度吧,难在如何让一个View按一定的时间曲线改变属性,这其实是属性动画该做的事,但是这里没有用属性动画,显然作者对View的动画很熟悉,我觉得这里作者用自己的方法实现了属性动画,` ScalingRunnalable在startAnimation中调用了PullToZoomListView.``this``.post(``this``);不懂得可以搜索_View.post_(Runnable),post调用ScalingRunnalable的run方法,而ScalingRunnalable run方法中再次调用了post,就这样不断的更新UI,直到达到一定的条件退出这个循环(这里这个条件是if``((!``this``.mIsFinished) && (``this``.mScale > 1.0D))),这里的关键点是每次执行run的时候mHeaderContainer的高度究竟该变化多少,
f2 = this.mScale - (this.mScale - 1.0F)
                    * PullToZoomListView.sInterpolator.getInterpolation(f1);
中PullToZoomListView.sInterpolator.getInterpolation(f1)给了我们答案,但是我也没太明白这个getInterpolation的含义,以后遇到这样的问题依葫芦画瓢就是了。


